こんにちは!TC3のAIチームの梅本(@mumeco_ml)です。LLM Advent Calendar 2023の24日目の記事です。
前回作成したLLMアプリに新しい特徴を付けていきます。今まではOpenAIのAPIを利用していましたが、このAIは動作させることが出来る環境があるなら外部のAPIを使わなくても動作させることが出来ます。コード類はGithubリポジトリにもアップロードしているので、コーディングが面倒な方はこちらも活用ください。
事前準備
- Python環境
- 今回はPython 3.10を使いますが、3.11などでも多分大丈夫です
- インストールしてない方は”python インストール OS名”で検索してください
- Poetry(できれば)
- ライブラリの仮想環境を作ります
- インストールしてない場合は公式に方法が書いてあります
- インストールが難しい場合はpoetryは使わずにpipを使ってください
- GPU環境(できれば)
- AIモデルを高速に動作させることが出来ます
AIモデルを動作させる
まずはローカルでAIモデルを動作させてみましょう。ちなみにこのAIモデルはよくLarge Language Modelを略しLLMと呼ばれます。丁度最近公開された高性能な日本語LLMであるSwallowを使ってみます。Swallowについては詳しくは公開記事を参考にどうぞ。
まず、動作させるために2つのライブラリを追加します。
- PyTorch
- AIモデルを学習・推論させるために必要なライブラリ
- GPUを使う場合はCUDAバージョン等を合わせてpoetryでは特殊なインストールをする
- Transformers
- 事前に学習されたAIモデルを少ないコードでダウンロード・使用することが出来るライブラリです
- SentencePiece
- サブワード分割をするライブラリ
- Accelerate
- 効率的な推論のためのライブラリ
PyTorch以外は以下のコマンドで追加できます。
poetry add transformers sentencepiece acceleratePyTorchはpyproject.tomlファイルを編集して以下の項目を追加します。以下の例だとCUDA11.8用のPyTorchをインストールしています。
[tool.poetry.dependencies]
...
torch = {version = "^2.0.1+cu118", source = "torch-cu118"}

[[tool.poetry.source]]
name = "torch-cu118"
url = "https://download.pytorch.org/whl/cu118"
priority = "explicit"
書き終わったら以下のコマンドでインストールが出来ます
poetry lock
poetry install
local_llm.pyというファイルを作り、最低限動作するスクリプトを書いてみます。このファイルを実行すると最初に14GB程度のLLMファイルをダウンロードするのでかなり時間がかかります。私の環境では大体20分ぐらいダウンロードにかかりました。
import torch
from transformers import AutoModelForCausalLM, AutoTokenizer

local_llm = None
local_tokenizer = None

def get_local_llm(model_name:str):
    global local_llm
    global local_tokenizer
    if local_llm is None:
        local_tokenizer = AutoTokenizer.from_pretrained(model_name)
        local_llm = AutoModelForCausalLM.from_pretrained(model_name, torch_dtype=torch.bfloat16, low_cpu_mem_usage=True, device_map="auto")


def get_local_llm_response(chat_history, model_name:str):
    global local_llm
    global local_tokenizer
    if local_llm is None or local_tokenizer is None:
        get_local_llm(model_name)
    assert local_llm is not None and local_tokenizer is not None
    input_ids = local_tokenizer.encode(chat_history, add_special_tokens=False, return_tensors="pt")
    output_ids = local_llm.generate(input_ids.to(device=local_llm.device), do_sample=True, max_length=128,temperature=0.99,top_p=0.95)
    result = local_tokenizer.decode(output_ids[0], skip_special_tokens=True)
    result = result[len(chat_history):]
    return result


if __name__=="__main__":
    model_name = "tokyotech-llm/Swallow-7b-instruct-hf"
    result = get_local_llm_response("こんにちは", model_name)
    print(result)
以下のようにLLMが文字を生成してくれました。まだ指示プロンプトではないので内容は気にしなくて大丈夫です。
こんにちは。つぼたっくのつぼです。
今回は、日本酒の「生酒」と「生貯蔵酒」についてご紹介します。
生酒や生貯蔵酒は酒屋やスーパーで、普通の日本酒より高く売られていますよね。
日本酒好きの方も、その中には「生酒とか生貯蔵酒って何なの??」という方もいるのではないでしょうか。
この記事では、日本酒の生酒と生貯蔵酒の違いについて解説し
GPT3.5とSwallowの切り替えの実装
次に前回作成したllm.pyを編集して、バックエンド側でGPT-3.5とSwallowを切り替えに対応できるようにします。
from openai import OpenAI

from local_llm import get_local_llm_response

client = OpenAI(api_key="ここにAPIキーを入力")
model = "gpt-3.5-turbo"

def llm_response(model_name, chat_history):
    model_name = model_name_convert(model_name)
    if model_name == "gpt-3.5-turbo":
        response = client.chat.completions.create(model=model, messages=chat_history)
        result = response.choices[0].message.content
    elif model_name == "tokyotech-llm/Swallow-7b-instruct-hf":
        result = get_local_llm_response(chat_history, model_name)
    else:
        raise

    return result

def model_name_convert(model_name):
    if model_name == "gpt-3.5":
        return "gpt-3.5-turbo"
    elif model_name == "Swallow":
        return "tokyotech-llm/Swallow-7b-instruct-hf"
    else:
        raise ValueError("Unknown model name")
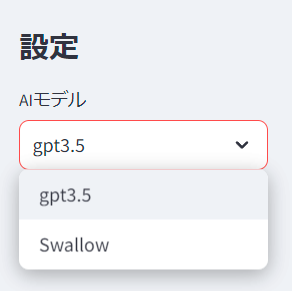
app.pyを編集しサイドバーのUI上でモデルを選べるようにします。
import streamlit as st

import prompt
from llm import llm_response

st.set_page_config(page_title="AIチャットアプリ")

if st.session_state.get("chat_messages") is None:
    st.session_state["chat_messages"] = [prompt.SYSTEM_PROMPT]

# sidebar
st.sidebar.title("設定")
st.session_state["model_name"] = st.sidebar.selectbox("AIモデル", ["gpt-3.5", "Swallow"])


st.subheader("AIとチャットする")

for message in st.session_state["chat_messages"]:
    if message["role"] == "system":
        continue
    st.chat_message(message["role"]).write(message["content"])

if message := st.chat_input():
    st.chat_message("user").write(message)
    st.session_state["chat_messages"].append({"role": "user", "content": message})

    ai_response = llm_response(st.session_state["model_name"],st.session_state["chat_messages"])
    st.chat_message("assistant").write(ai_response)
    st.session_state["chat_messages"].append({"role": "assistant", "content": ai_response})
ローカルLLMはOpenAIのAPIのようにリスト型の情報を渡すとエラーになってしまうので、文字列型に変換する必要があります。なので以下のようにプロンプトを作る関数を定義し、ローカルLLMの入力を事前に変換しておきます。
def get_local_llm_prompt(chat_history):
    prompt_template = """以下に、あるタスクを説明する指示があり、それに付随する入力が更なる文脈を提供しています。
リクエストを適切に完了するための回答を記述してください。\n\n
### 指示:\n{instruction}\n\n### 入力:\n{input}\n\n### 応答:\n"""
    inputs = ""
    for message in chat_history[1:]:
        inputs += f"{message['role']}:{message['content']}\n"
    prompt = prompt_template.format(instruction=chat_history[0]["content"], input=inputs)
    return prompt
ここまで実装した後に、poetry run straemlit run app.pyをするとサーバーが起動して、以下のように左にサイドバーが出てきてモデルを選択することが出来るようになっています。
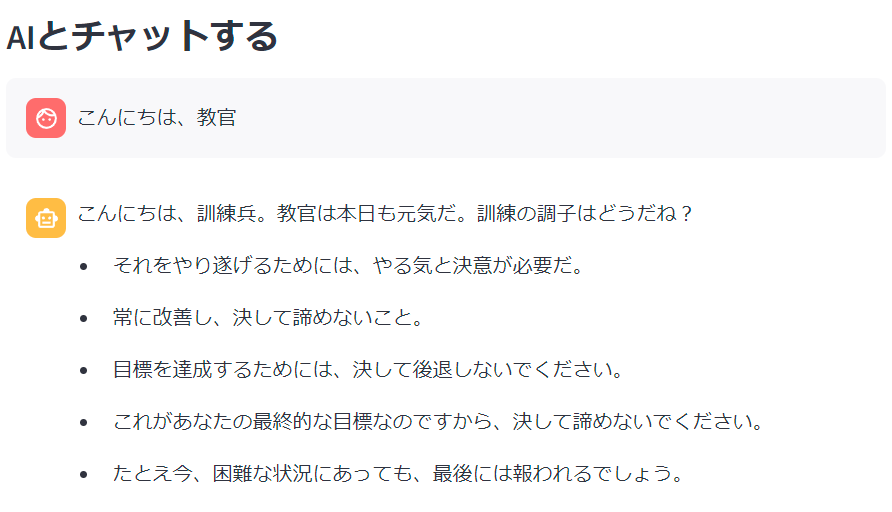
Swallowを選択し、チャットをしてみます。GPTほどではないのですが、うまくチャットが出来ている気がします。
まとめ
今回はOpenAIのAPIを使わずに、ローカルのPCでLLMを動作させてみました。プロンプト部分に関してはかなりGPT用の入力をそのまま使ってしまっているので、ここを改良すればより良いAIになると思います。時間のある方はこれにチャレンジしてみると面白いかもしれません。
次の記事 → 【初心者向け】1時間で自分だけのAIチャットアプリを作ろう!〜ローカルLLM編〜
●ご案内
この内容をベースとしたデモアプリ、「GigComet」を現在無料でご利用いただけます(サービス紹介サイト、デモサイト)。是非ご利用ください!